Jan 29, 2013

Anthropologie Rosette Round Pilliow Knock-Off


This is a repost of week 3 SYTYC. Week 4 is up and I'd really appreciate if you'd hop over and vote for your favorite! Everyone that has guessed so far has gotten mine right! Can you figure mine out this week??

I just got this new bedding from Anthro when they were having their huge after Christmas sale. I am obsessed to say the least. I love it so so much. And when I saw the email about the new rosette pillow I died. It's adorable. But, I knew I could make it for much cheaper. $78 for a small accent pillow wasn't going to happen any time soon. Especially when I made my knock-off for F-R-E-E. It's true. I had the fabric, stuffing, & thread all on hand. Thank heavens for a lovely friend who loaned me her sewing machine for the day. You're a peach :)


 First cut a pattern. I used a piece of yarn tied to a pencil to get an exact circle. Cut the yarn to half the size you want your actual circle to be and then draw your circle from the corner of the paper. Fold your fabric in quarters and line up your pattern. Cut & this should get you a perfect circle. I wanted my pillow to be around 18ish inches ha so my yarn was 9 in. This piece is the back of your pillow.


Now, you will cut the strips for the middle section of the pillow. I did mine 4" by as much fabric as I could get out of my scraps. I wish I had a little more than I did so that I could make it more ruched. Just make sure you have at least double the fabric to go around the circle. I just used all that I had left which was about double :) I also had to stitch the strips together so make one long strip, but it doesn't matter because you can hide those seams in the pleats. I don't have a picture of the next step but you will need to ruffle at least one side of this long strip. You can do both, but I just ruffled one side and then pinned then other.


Then, you will need to get the front of your pillow ready. Cut out a strip that is 9"(or however big you want your pillow to be.) by as long as you can get it. Mine was 40". Again I think I would have like it to have more pleating so I would have loved a little big more fabric, but I was working with what I already had. Sew a running stitch along the bottom like we did here. and gather the fabric as you sew. You can do this by hand or on a sewing machine.

When you get to the end, sew the ends together, right sides together. Again, you can sew by hand or with a sewing machine.
For the middle of the pillow, I cut about a 4" circle from the scraps and stitched it right to the middle of the rosette. I just hand stitched it all together on the inside.


Now you're ready to start assembling the pillow. Take the middle piece and pin it, right sides together onto your front piece. See how only one side is ruffled but it automatically ruffles the other. It worked for me, but if you are more of a perfectionist you might want to ruffle both sides. Sew the middle section to your front.

 
You're almost there! Take the piece you just made and pin the middle to the back piece, right sides together, making sure to pleat as you pin (if you haven't already). Make sure you leave a pretty good sized hole to stuff the pillow if you are not using a pillow form. Sew all the way around until you get to your hole. Flip your pillow right side out, and stuff the pillow full. You'll want to use more batting than you think to make a firm pillow. Hand stitch, or liquid stitch the hole closed and you are finished with your Anthro look-a-like!


I'm so glad I've been a part of this competition, it's allowed me to be creative and get those projects done I've been wanting to do for ages!

Jan 25, 2013

Friday Faves {no.23}

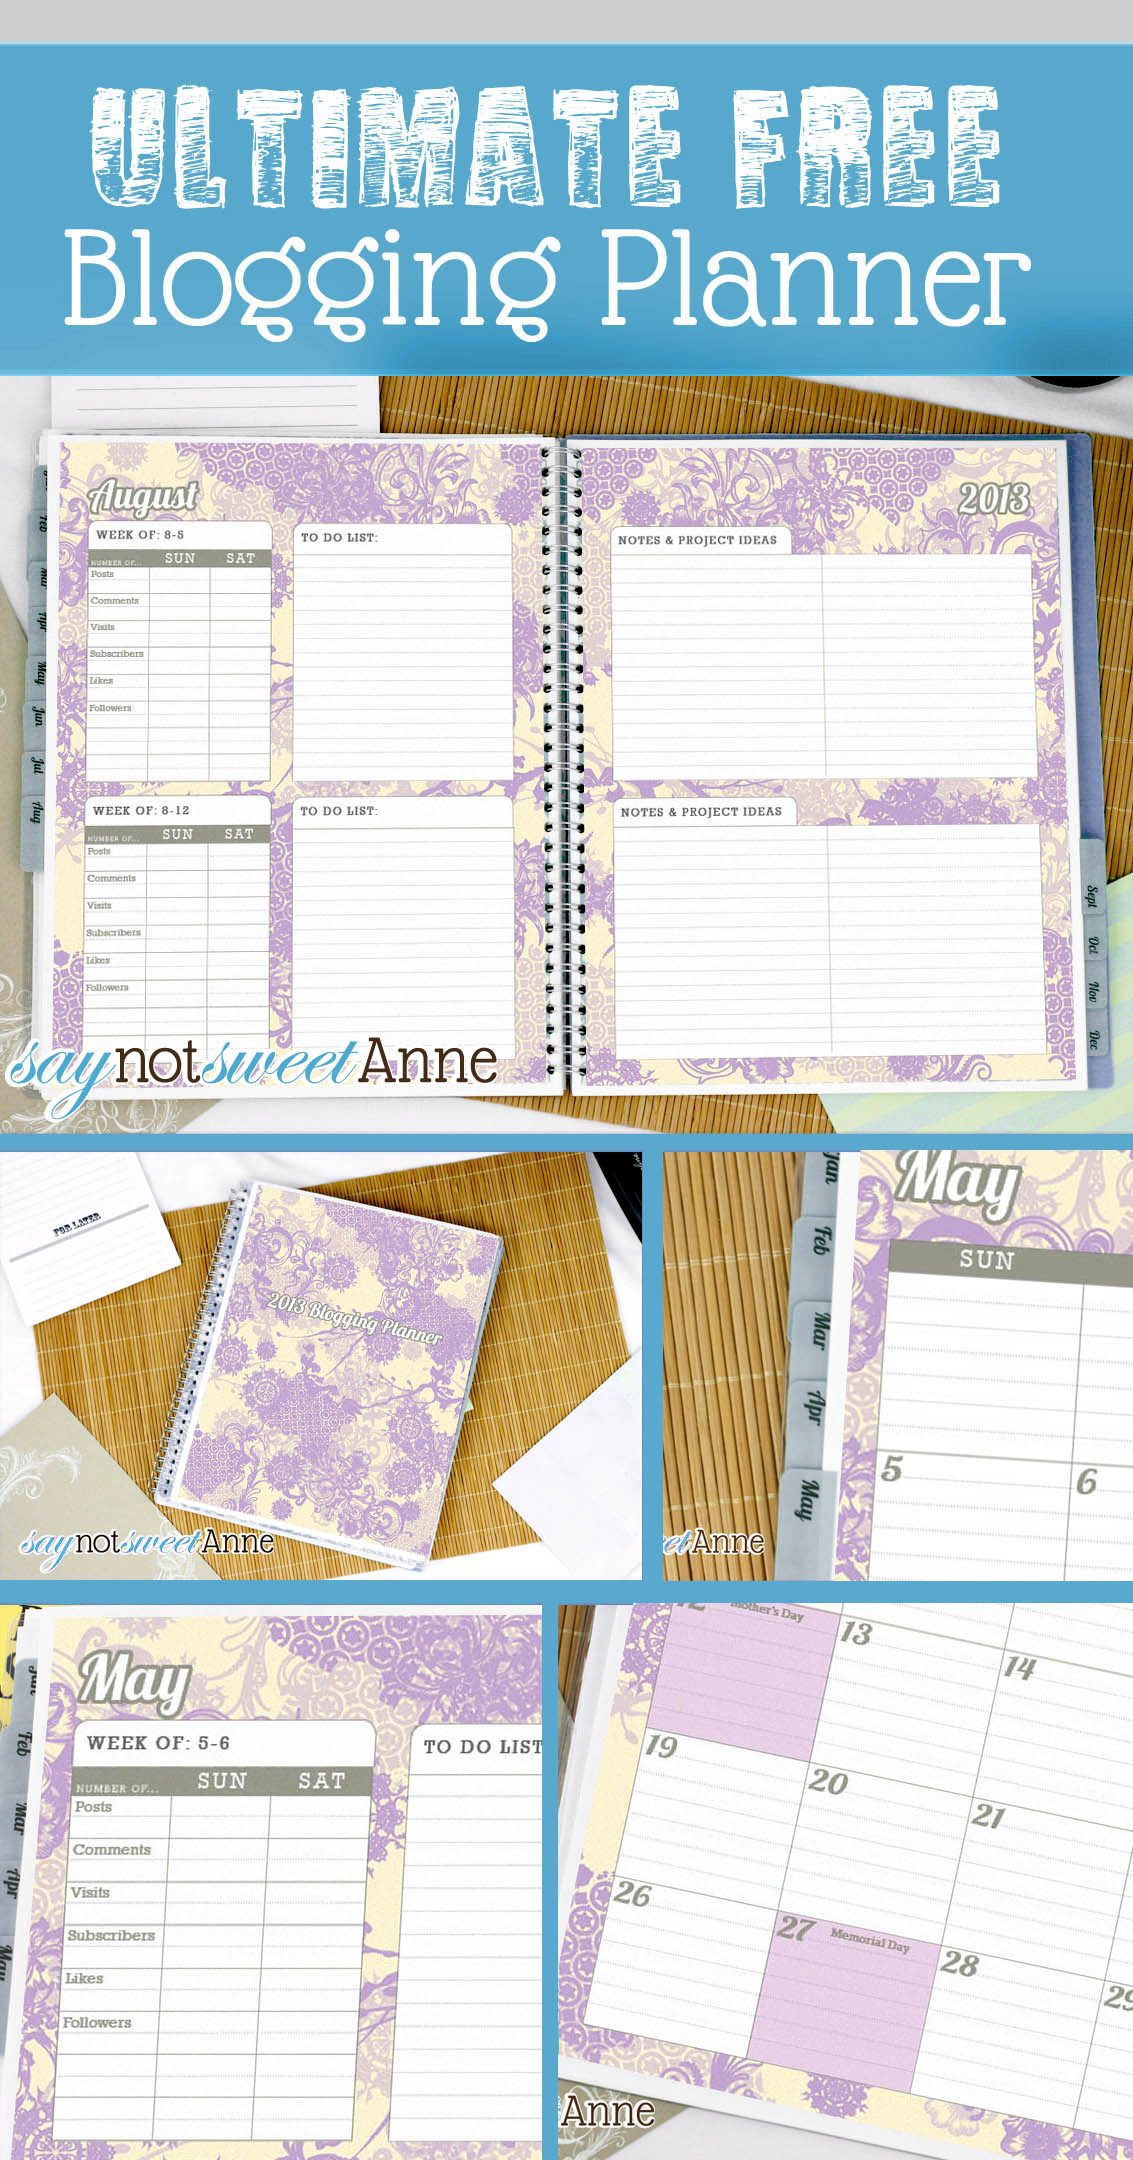
1. I am completely in love with this absolutely darling planner. Plus you can't beat the price tag {free} Thanks Say Not Sweet Anne!

2. I love love love this "Tufted Spots" pouf from Nordstrom. I feel like I could figure out how to make it. Or I feel like I could just buy it. So cute.


3. I think this quilt is fantastic. I'm thinking I need one for Miss B & Miss R's big girls room...


4. Anyone know where to find this chandelier? Or one like it? I want it for over my dining table. Love it.

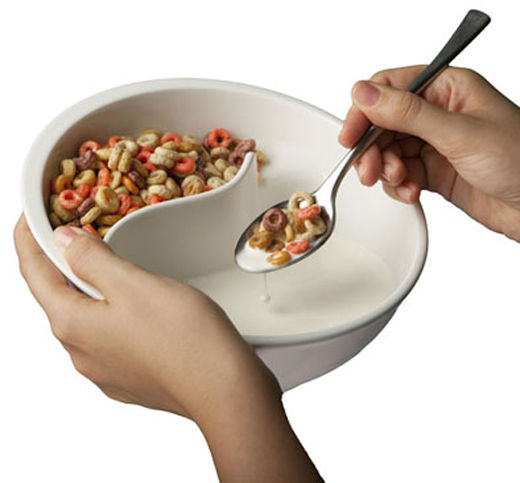
5. I think this bowl is genius. I hate soggy cereal.


Jan 22, 2013

Shark Stuffie {Free Pattern & Tutorial}


This was my project for Week 2:For the Boys of SYTYC. I survived another round! Voting is up for week 3 and I'd love it if you'd take a second to vote. It ends Thursday! Thanks to everyone who voted for me last week. Truly appreciate it.


Guys. This was seriously the hardest challenge for me!! I know NOTHING about boys! So, I thought and thought and thought and then suddenly the projects were due and I still had no idea about what I was going to do. GAH! Then it struck me. Even though I don't have any baby boys I have lots of fun friends having boys. So, what do baby boys like?? haha I tried to think of the most boyish animal & color I could and I came up with this little cutie.pa.tootie. I made him with liquid stitch because my sewing machine is out of commission at the moment but it worked just fine! So if you don't have a sewing machine don't fret. And somehow my computer lost all of my tutorial photos, minus the pattern pic. So that will have to do for now... And here he is...I picked out the manliest fabric I could find in my stash of florals and pinks ;)

Download the Free Pattern All I kindly ask for using my pattern is for you to follow me, on facebook or GFC or both :)

*1. Sew 2 fins right sides together, leaving the bottom unstitched. Sew a total of 3 fins and set aside. (Sorry don't have a picture for this)

2. Pin the 2 body pieces together with one of the fins inserted into the seam. You'll need to carefully sew so the it's isn't sewn shut. Otherwise you can stuff the fin first and then just sew the fin into the seam easily.

 3. Then, sew on each of the other fins onto the body. Only sewing one side of the fin so you can stuff it at the end. Or, like in step 2 you can stuff them first and then just sew them right on.
 4. Sew on your eyes. This is what your shark should look like right now once it's flipped right side out.

5. After you've sewed on your eyes, flip it inside out again and sew on the "belly" piece of your pattern (right sides together) I kind of pleated around the mouth so that it would look a little like teeth? Make sure to leave a hole somewhere around the belly so you can stuff your shark nice and big.
 Here is a picture of how I did my fins so I could stuff them at the end.

6. Hand sew (or use liquid-stitch) to close up the hole. Since I was using liquidstitch I folded down the seam a little and pinned until it dried.

 Annnnd you are done! Gift it to a friend, or give to your little buddy. Maybe someday we'll have a boy to make one for ;) until then I will settle for giving them away as gifts...


Thanks for stopping by and please let me know if you have any questions. I'm not the best at tutorial making...

Camille


Jan 21, 2013

Monday Funday

Hey guys! Just popping in to say THANKS to everyone who voted last week. I made it through another round. Mine was the shark as everyone guessed :) You all know me well...Come back tomorrow for the tutorial & free pattern! Week 3 is up at SYTYC, please take a second to head over and vote for your favorite! Also I love seeing if you can guess mine out of the bunch...


Jan 16, 2013

Pesto Ranch Pasta Salad

Oh heyyyy here is a recipe that is so delicious and so refreshing I can eat it as leftovers for days. Yuuum. I always save a little pesto on the side to dip some good italian bread in. I feel like you could add chicken and it would be good too. I hate cooking meat though and love it without. Also, another hint. I buy a big jar of pesto at costco and if we can’t use it in time I freeze the pesto in icecube trays for later. I have a hard time saying how much dressing to put, it’s different every time we make it depending on how saucy we are feeling like..

Pesto Ranch Pasta Salad

-Cooked box of bowtie pasta

-Couple handfuls of spinach (we use the spring mix of greens from Costco)

-Container of cherry tomatoes

-Ranch Dressing

-About 2-3 Tablespoons of pesto

-Feta Cheese to top it


Gather your ingredients.

pastasalad

Cook up your pasta. Run cold water over it after it’s cooked.

pastapestoranch

Toss all of your ingredients together.

pasta salad2


Top with your feta and enjoy :)

pesto pastasalad

Jan 14, 2013

Chicken Wire Message Board

REPOST: This was my first week's project on SYTYC. Here it is if you didn't get a chance to head over there! The second week voting is up! I'd love it if you'd go vote for your favorite. Can you spot mine?

This project first started out as a mirror, covered in disney stickers that refused to come off. {thanks to some Goo Be Gone they all came off ;)} I thought it would be an adorable chalkboard so I painted chalkboard paint onto the back and it was fabulous. For a couple weeks. Then my husband was vacuuming and it dropped and shattered. Fantastic. Then I had the brilliant idea to turn it into a message board/bow holder. I couldn't be more pleased! It holds a million bows and little messages/to-do lists/cards & invitations. I love the way it turned out!


Jan 11, 2013

Friday Faves {no. 22}

Wow. It has been a looong time since I posted a Friday Faves. I've been feeling quite hectic lately and I think I need to simplify. I've started organizing the house finally and I think it's helping the chaos slowly dissipate. I also hadn't been on pinterest for a while but I decided to get on and work on my goals for 2013, one of which is to lose the last of my baby weight. I have a board called Losing the Baby Weight, how appropriate. Here are my favorite work out pins :)

1. Plank Workout

She has a ton of workouts you can do around the house. Awesome

3. Bikini Body Max Burn Pyramid

4. Killer Kardio
uhh don't click on the link apparently it's a bad link, but the workout on the pin seems challenging :)

5. Abs Circuit
This is another one you shouldn't click but the circuit made my abs sore for days...


Don't ask how many times I've done these workouts, it's embarassing. However here is to 2013 & getting back into shape! Happy Friday everyone :)

Jan 10, 2013

White Cloud & Children's Miracle Network

This is a Sponsored post written by me on behalf of White Cloud for SocialSpark. All opinions are 100% mine.

White Cloud Facial Tissue is teaming up with the Childrens Miracle Network! This is a great campaign and I'm so glad I get to share it with you all. White Cloud believes that just because the Christmas season is over, doesn't mean we have to stop with the wonderful giving spirit. I whole heartedly agree. I think during December we are all aware of the needs going on around us and in a generous mood. I feel like we can keep that spirit alive throughout the year! White Cloud along with CMN had children in hospitals around the county design templates that could become the next facial tissue design. They narrowed it down to the top 10 finalists. They are all on the White Cloud Facebook page where we can all vote for our favorites. THREE winning designs will be chosen and put on the facial tissue boxes sold in Walmart stores in May. Along with the fun contest for the children, White cloud is donating to each of the CMN hospitals with winning designs. If you go vote you can be entered into a sweepstakes for Wal-Mart gift-cards!

I loved helping my girls get into the giving spirit this Christmas and I hope I can help them feel it all year long!

I voted and it took only 2 minutes! I like the Hope design best. Which is your favorite?? Use the Voting App to cast yours!

Like White Cloud on Facebook


Abbreviated rules: No purchase necessary. Void where prohibited. The Children's Miracle Nextwork Contest and Sweepstakes are sponsored by Kruger Products (USA), Inc. The Contest is open to legal residents of the 50 United States and the District of Columbia, between the ages of 4 and 14, who are eligibale patients of the 168 participating Children's Miracle Network Hospitals. The entry period for the Contest begins on November 29, 2012 and ends on December 28, 2012. The Voter Sweepstakes is open to legal residents of the 50 United States and the District of Columbia, 18 years of age or older. The Voter Sweepstakes begin at 6:00 pm ET on January 3 2013 and end at 11:59 on January 30. For official rules visit http://mywhitecloud.com/tissue…

Find a store near you!

Visit Sponsor's Site

Jan 9, 2013

So long 2012

Happy New Year everybody! I hope you all had a wonderful holiday and are now finding it easy to get back to into the grind. I, however, am not. We went on a week vacation to California and I now have about 18 loads of laundry. 2012 was a crazy, busy, stressful & fun year. We had a lot of good & a lot of hard. I'm hoping for the same for 2013. I decided it might be fun to share the top 10 posts YOU guys loved the most in 2012. So here it goes...


1. Cilantro Lime Chicken Rice Bake. By far this is my most viewed. And for good reason! It's delicious :)

2. How to make a Chevron Maxi.  Anytime I wear this I get stopped at least 3 times asking where I got it. You should go make yourself one. I also had a lot of readers email in to ask where I got this fabric. I haven't been able to find anymore and I'm SO bummed! If I ever find more I'll let you all know!


4. DIY Pallet Playroom Stage.


6. Yummies Chocolate Chip Cookies Ever.

7. 20 Min. Pencil Skirt.

8. Free Printable Thank You Cards

9. Tomato Basil Quinoa Recipe


10. And last but not least...Mason Jar Herbs