Feb 29, 2012

Felt Bow Bonanza!

With all this extra time on my hands I decided I needed to do something a little creative. So, I may or may not have gone a little overboard on making felt bows. They’re so simple to make and are definitely a project I could do while laying in bed. I also have been borrowing my husbands laptop and am trying to figure out photoshop. Any tips for me?? What are the easiest tutorials to follow? I’m having a hard time figuring it out on my own…Anyways I decided to take looots of pictures so enjoy :) These little bows have been around a long time and are pretty much self explanatory but I figured I’d do a “tutorial” of pictures to explain how I make these little cuties. My girls have had fun trying on every color, which I love because they refuse to let me do their hair. At least if they’re wearing a bow it kind of looks like a tried right?? Hope you’re having a great leap day!


felt bow tutorial copyIMG_6350IMG_6353IMG_6359IMG_6366IMG_6361IMG_6405IMG_6407IMG_6384

Feb 27, 2012

I'm dreaming of a...

new table. Lately I've been obsessed with looking at dining rooms on pinterest. Why? I have no idea, maybe because right now I have the worst glass table in the world. Did you know that having a glass table is the bane of my existence? With 2 toddlers cleaning it is the absolute worst and it NEVER looks clean for longer than 2 seconds. So. I've decided the second I get off bed rest I will be on the lookout for a new table. I just can't decide what style to go with. Farmhouse table? Elegant? Traditional? Shabby Chic? Modern? Rustic? Am I the only one that can't decide on what theme to go with in your house?? I just love it all and can't choose one.  Here are some of the dining rooms I'm loving these days...


Anyone have good dining room pics to share with me?

Feb 25, 2012

Homemade laundry detergent?


Yay or Nay? I didn't want to try it at first thinking it wouldn't get the job done. I am a Tide girl through and through but when  my sister said she tried it and liked it I figured I'd give it a go. And the verdict is...yay! I love it! It gets the clothes just as clean as before for pennies! SO, if you are hesitant to try it I would have to say go for it. To get all of the supplies including a 5 gallon bucket it cost about $15. I've made around 4 huge batches without having to go to the store. It's really simple to make and it's worked for our family wonderfully.  Here is where I pinned the recipe. The only adjustments I made was I used more fels-naptha bar than the recipe called for. So has anyone else tried out the homemade laundry soap? What recipe do you prefer?

Feb 24, 2012

Easter is coming...


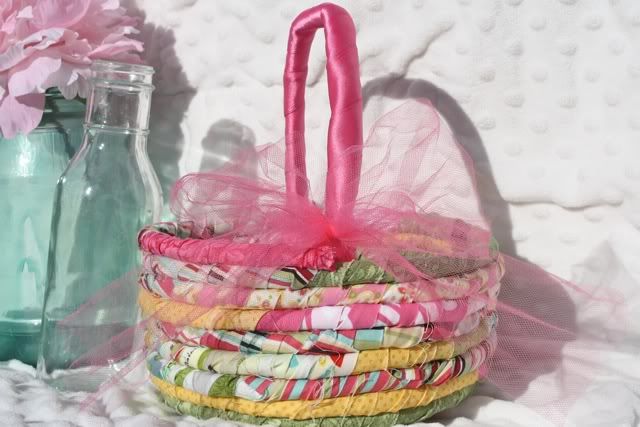
and since I have some time on my hands due to bed rest I decided I should finally make the second homemade Easter basket for my girls. Its the perfect hand sewing project I've been looking for and am glad I sewed all the strips together last year so all I have to do is sew up the basket. These Easter baskets turned out so cute and have become a purse/hat/basket for all year round. My girls are obsessed. So if you'll excuse me I am going to go watch some Downtown Abbey and hand sew to my hearts content :) Hope you all have a fabulous weekend!


Feb 14, 2012

Happy Valentine's Day!

So, I know I've taken a 5 month break...But it's been a little crazy around here. I'm pregnant {24} weeks and have been on bed rest for the last month & a half. I've been trying to keep myself busy with movies, netflix, books, you name it...but I'm starting to get the creative itch again and think it might be good for me to focus on crafting again (things I can do from my bed of course and things I already have on hand, since sending my husband to the craft store might be the worst idea ever.) I'm not making any promises because who knows how often I will post but figured I'd put up some pictures of my minimal Valentines decor this year. It's kind of been fun trying to figure out crafts I can do with the supplies I already have, interesting but fun. For example, my wreath is made out of a diaper box...and burlap & tissue scraps. I hope you all are having a wonderful Valentines Day today and spending it with those you love :)

Photobucket
Photobucket
Photobucket
*this Valentine's banner is made using the same tutorial as my spring banner HERE*
Photobucket
*I found this fun bunting on Pinterest here, but left out the buttons and hot glued ric-rac to the top*
Photobucket
*I'm sure you've also seen this taffy centerpiece floating around pinterest. So cute and So simple to make. My cute MIL gave me the supplies to make this one and ended up being a fun craft do in bed...*

Oct 17, 2011

Winner Winner

Chicken Dinner!  I know I was supposed to post the winner on Friday but we decided to go North for a cabin trip and some cooler weather. While on said trip my phone decided to go into "recovery mode" whatever that is. It won't turn on without a computer, which we didn't have. We also didn't have a tv all weekend. But, it turned out to be one of our favorite trips yet! Without all of the electronics to distract us we had some quality family time. Wrestling the girls, swinging in the backyard, taking loooong naps, and walks galore. We saw elk and searched for a "pink bunny" because my oldest wanted to try and find one. It was good times. So now I am officially posting the winner. And I can not get the picture of the random.org number to work so I will just tell you it's #32! Which means Samantha you're the winner! I'll email you this week to figure out how to get you your apron!! Congrats :)
Photobucket

Oct 11, 2011

Halloween Countdown Blocks

I got the idea here on Pinterest to make some countdown blocks. I was really excited because my husband had some extra wood on hand that was the perfect size. So I cut the blocks, modge podged some scrapbook paper to it, and then used my trusty friend's cricut to cut out the numbers and letters. I love how it turned out! I also love that it usually says something like "82 days til candy" because my kids love to play with them. Whatev! They still look cute and that's all that matters right?? Go ahead make your own! And while you're at it you should make your own modge podge because it works just as good and cost pennies :) Just mix 3:1 elmers glue to water. Or whatever ratio you want until you get a good consistancy...I got that idea from pinterest but apparently I forgot to pin it.  here is the website. Now go ahead and make your own blocks! We still have 20 days til Halloween!
Photobucket

Oct 9, 2011

BeWITCHing Halloween Craft

Yes, I just went there with the pun. I also know that I said I'd post a Halloween idea every day this month, but honestly who really believed me? Haha I always think I can do a lot more than what is really gonna happen. Today I'm going to show you a fun Halloween craft that the kids can help you with (or not if it will drive you crazy like it would me) But it is that easy people.

First, cut a shape out of burlap. I decided to do a curvy frame...
Photobucket 

Second, Print off a picture of a  witch sillhouette. I seriously can't find the website from where I got this from. I've googled "witch sillhouette" a million times and now this particular one is lost forever but you can use any picture you want! Then trace around your shape with a sharpie.
Photobucket

Third, Fill in your sharpie picture with modgepodge (Be careful to get right up to the line, but you might have to fill in some holes later...) After you have covered the picture with modge podge you sprinkle your glitter on. Shake off the excess glitter onto a piece of paper so you can reuse it to fill in whatever holes there are...
Photobucket

Fourth, Take cardboard (Or a fruit snack box if you don't want to go to the store) and cover it with modge podge. Then put a piece of scrapbook paper onto the modge podge..
Photobucket
Photobucket

Last, you modge podge your witch sillhouette/burlap onto your paper and you are finished! I sprayed mine with hairspray to keep the glitter from falling off and it worked like a charm. String some ribbon through the top and hang it up! I still haven't decided where this little witch will go...
Photobucket
Photobucket

Hope everyone is getting excited for Halloween!
PS Don't forget to enter my giveaway for a ruffly apron HERE! Thanks!

Oct 5, 2011

Pumpkin Muffins

So I'm sure you've seen this pin floating around Pinterest lately. I decided I had to try them. I made some homemade pumpkin puree last year and figured I'd better use it up before this fall hits and I can make some more to replace it. So, I changed the recipe up just a tiny bit but it was still the easiest recipe I've ever made and was SO delicious. My husband and I may or may not have finished off 10 of them ourselves that first night. Here is the deal on how you can gain a couple pounds in a couple hours....
Photobucket
Photobucket

Homemade Pumpkin Puree
-2 pie pumpkins (I figure I should at least do 2 if I'm going to the trouble to do it, it should last me the rest of the year...)

*Cut your pumpkins in half and place them insides down in a pan. Fill the pan with about an inch of water. Cook at 350 for about 45 min. or until tender. Take your pumpkins out and scoop out all of the seeds. Throw them away or make some salted pumpkins seeds. Scoop your pumpkin out and place in a blender (the pumpkin should be so tender that it's very easy to scoop out). Blend it all up and place in separate bags. I just put it in 3 huge gallon sized bags. Turned out to be the worst idea I ever had. Since it was all thawed I had to use up 5 cups so we also got pumpkin pie this week. So, I suggest freeze in 2 cup increments.


Yummy Pumpkin Muffins
-2 cups pumpkin puree
-1 tsp cinnamon
-1 tsp pumpkin pie spices (nutmeg, cloves, etc.)
-1 box of yellow cake
-Chocolate chips (optional) I added this because I don't think pumpkin treats are the same without chocolate in them. My husband hates chocolate and pumpkin so I did half and half and they both turned out delicious!

*Cook as directed on box, sprinkle with some powdered sugar and enjoy :)

Easiest and fastest recipe ever!
PS Don't forget to enter my giveaway HERE! Thanks!!

Oct 4, 2011

Halloween Month Begins...

Yep, I know, I am once again late for the beginning of a holiday/season. Four days to be exact but who's counting? I decided that I would feature some type of Halloween{ish} post a day. And to kick it off I will share with you my halloween wreath I made the other day. I used this pin to make the wreath form. It was super duper easy and verrrry cheap. BUT I don't know how she got a perfect circle (Maybe hers didn't get run over by the car....just a guess)  Oh well it still worked out. All I did was take some leftover black fabric and black tulle and cut it into strips. I honestly just cut whatever sizes I felt like and then trimmed them down to the size I wanted. Then tied knots alternating 2 fabrics to 1 tulle. I'm thinking I like it! Stay tuned this week for more cheap/fun Halloween ideas :)

Photobucket


**Don't forget to enter my giveaway for your own Ruffly Apron!! HERE**

Oct 3, 2011

Giveaway!!

Hey friends! It's been awhile I know...I've been busy with my loads and loads of laundry, and cooking, and cleaning (what's gotten into me??) I used to never like to cook but maybe it's the thought that fall is coming soon!? But I've been baking up a storm. I have my favorite new recipe that I will be posting soon :) But for now I will leave you with a giveaway. I finally hit 100 followers woot woot! It's taken me foreeeever to decide what I'd giveaway and finally have concluded that I will be giving away a RUFFLY APRON to one lucky winner!

Photobucket
Photobucket

*Winner will be able to choose the color combo of their Ruffly Apron and have it shipped to their door :) All you have to do is be a follower of Sugar Baby Boutique and leave a comment saying so & tell me what color combo you would pick. Some extra entry options include:

-Blog about this giveaway (leave a separate comment saying you did)
-Facebook about this giveaway (leave a separate comment)

**That gives you 3 chances to win!! Thank you to everyone who follows my blog I love reading all of your comments and emails it makes my day! I will use Random.org to pick the winner on October 14th (which also happens to be my birthday...:) )

Sep 26, 2011

Pinned. Food Edition.

I have a slight obsession with Pinterest. It's addicting on so many levels... But I decided it almost leaves me struggling to decide on what I need to accomplish. Like my To Do list grows to over 100 in minutes... Yesterday was definitely a Pinterest filled day (in a good way) I got a lot accomplished and also had a couple failed attempts at things. Here are the results:
Yogurt Covered Pretzels


* I was really excited about this recipe because I love yogurt covered pretzels, but alas it was a FAIL. I followed the recipe almost exactly but they did not set up like the picture. So, try at your own risk ;) 

Zupas Wisconsin Cauliflower Soup

*My husband and I love a restaurant in Utah called Zupas. They have the yummiest salads, soups and sandwiches YUM This soup recipe for our favorite was a HIT!  We loved it. I added a little more flour because I was nervous it wouldn't thicken and then it was too thick, so stick to the recipe!
 
Paradise Bakery Sugar Cookies


*These cookies didn't taste exactly like Paradise but they were still pretty good. I'm more of a chewy sugar cookie girl but they were fun to make and tasted pretty good! I'd call it a success overall...


*I can't remember where I got this picture? But we decided to try to make Zupas Nuts about Berries salad and it was a pretty close match...We topped romaine and iceberg lettuce with strawberries, blueberries, and candied almonds. The recipe for the dressing is:
1/2 cup of oil
1/4 cup red wine vinegar
1 tsp sugar
salt and pepper to taste
(a little bit of fresh lemon juice is always refreshing to add as well...)
This is my favorite dressing for salads and is SO yummy paired with berries! 

PS I hit over 100 followers this week! Woohoo! Thanks to everyone who cares to listen to my ramblings :) Look out for a giveaway sometime this week! 

Sep 15, 2011

Happy Birthday Bear!

It was my lovely daughter's birthday this last week and she was turning 3. I have always thought 3 year olds looked so big and now she's one of them. My baby is all grown up... Here are some pictures from her big day! I got the cute subway art from one of my favorite blogs here. and I got the cute little yellow print somewhere online and now I can't find it for the life of me?? So if you know where it's from please share :) I made the fun birthday hats one night while I should have been sleeping. Maybe it was the coke I had at dinner, mixed with the migraine medicine I took but I was up allll night. But the party hats were a hit and Miss B loved her birthday girl hat and kept asking when her friends and cousins were coming so she could wear it. I drew my own template for them and hot glued them together. I used up a bunch of my fabric strips for the "ruffles" (which you know how much I love using those up!) All I did was cut my strips, glued a line of hot glue along the bottom of each hat and scrunched the fabric as I went. Then I used elastic thread and glued it to each side. SO easy and SO cute :) I'm thinking I need a picture of them in a hat for each birthday they have. Now that the birthday is over, it's time to start tackling some much needed projects that need to get done. Wish me luck!

Photobucket

Photobucket
Photobucket
Photobucket
Photobucket

Visit thecsiproject.com

Sep 7, 2011

Thankful Banner

Photobucket
So...I have been loving the prospect of fall...if only it would get here already! I decided to make a fall/thanksgiving banner yesterday. I used burlap for the pennants and glitter because I had no craft paint :) and we all know I don't go to the store unless I have to. Battling two toddlers at the craft store is basically the worst thing ever. So, I had bought some stencils from Michaels and I traced them onto each pennant (each one measures around 7.5 in x 8 in) with a sharpie. Then, I filled each letter with modge podge and then sprinkled the glitter onto the modge podge. I tipped each letter upside down to shake off the excess glitter and set it aside to dry. Once the modge podge/glitter was dry I sprayed each pennant with aerosal hairspray to help any of the glitter from falling off. I'm hoping this will help keep the burlap from fraying too much...we'll see!
Photobucket
Then I hot glued ric rac onto the top of each letter and it's done! Easy peasy but super fun! I love me a good banner...
Photobucket
Photobucket

Sep 2, 2011

Autumn Subway Art {free printable}

Since it is officially September, I thought I'd bust out some of my fall decor. Even though it is still 127 degrees here in AZ I'm hoping that if I pretend it's fall, the weather will follow my lead. Since I got married the decorating budge was pretty much non-existent. So, I decided I'd add to the holiday decor little by little every year. That is why this year I decided to add  an Autumn Subway art to my collection. Because it's free. I love that. Here are some pictures of my fall "mantle" this year. I'm hoping to get some more decorations done soon...Also, I made the Subway art printable for free for all of my readers! Just download and print! I printed mine on an 8x10 sheet of cardstock and it worked perfectly. Enjoy!

Photobucket
Photobucket


Photobucket