Hey everyone! How’s your Tuesday looking?? I decided to share a tip for you I recently have been using & loving. If this is nothing new, can you all pretend you’ve never heard it before?? k thanks. Since I’ve been baking a lot I thought I’d share this little tidbit! I don’t know about you but my brown sugar can get rock hard. It’s the worst because you usually don’t notice until it’s too late. And going to the store isn’t an option for me unless it’s dire. Going to the store with 3 littles is normally out of control…So next time you find you’re brown sugar is impossible to break up, put it in the microwave (I put the lid on diagonal so it’s covered but has a couple holes) with a little bowl of water. Microwave for 30-50 seconds at a time. It will soften right up!! It’s magical people ;) It usually takes me 2-3 times before it’s soft enough to use for cookies FYI. And just so you know it hardens right back up again so you might want to pick up new brown sugar next time you’re at the store…

Aug 7, 2012


Aug 5, 2012
Pinned!
I have made these snickerdoodles twice in the last week. They are DElicious. Granted the first time we gave some away…But I highly suggest you make a double batch. A single batch doesn’t seem like near enough...

I also tried this lemonade cake. To be honest it didn’t turn out as heavenly as I had hoped. However, it could have been my fault, I tend to over mix things. The frosting was amazing though. I’m thinking I might just make a batch of frosting just to eat by the spoonful. Just kidding. But really…
Did you know about this cute website?? They have TONS of free backgrounds for your iphone or ipad. SO so cute.

I tried this recipe to make your house smell ah-mazing. And oh boy, it did! Love love love. I might have to do this once a week…
Have you tried any of your pins?? Have any favorites to share?!
Aug 3, 2012
Friday Faves {no. 13}
1. Ah I’m loving the Olympics this week guys! Gymnastics and swimming are my favorites but something about watching the Olympics makes me all patriotic and proud of our country! Can I complain for a second? Why does the news keep ruining the surprises?? I turned it on this morning and found out everyone who won gold…which we weren’t supposed to see til tonight. Lame.

2. I’m loving this mini sock bun on Miss B. Seriously, tooooo cute! (Maybe I’m just happy she’ll actually let me tame her wild locks) Also I can’t get enough of her poses. HIlarious. Find out how to make a pencil skirt here.


3. This fabric. I just bought a remnant and can’t decide what to use it for! Am I the only one that has a hard time cutting up pretty fabric??

4. Jimmy Johns. YUM. We went last night for dinner and even the girls gobbled up their sandwiches. I promise I do cook…sometimes.

Aug 1, 2012
How to Weather & Age Wood
with Steel Wool & vinegar.

What you need:
-wood you want to age ;)
-vinegar
-steel wool (you can find steel wool in the paint section in any hardware store by the stain)
-glass jar
Start the day before you start you project. Put a small amount of steel wool grade 000 into your jar of vinegar. Let it sit overnight, or for up to 2 days. I didn’t get to my project when I was expecting to and had to start over. Bummer! This is what it should not look like:

Now, if it doesn’t look like this it’s time to start. Filter your steel wool out of your vinegar. You could use a coffee filter, or if you don’t have one I just used a paper towel, because going to the store was just not worth it. I just brushed mine on with a cheapo synthetic brush and it worked great! Harbor Freight is the best place to get cheap brushes. If you catch them while they’re on sale, you can get them for 50 cents! Brush on your “stain” and your wood will start changing. It’s actually really fun to watch. Now, if I were to do it all over again I would have watered my vinegar down. This picture was taken right after I brushed it on, but by the next morning it was darker. I think if you water it down it would stay a lighter gray so FYI. If you are going for almost black though Leave your vinegar in for 2 full days and brush it on real thick you will get BLACK.

Now, I sanded the entire area and wanted to do a whitewash on top to lighten it up. To do a white wash pour some paint into a container. I used old tupperware :) Mix your paint and water. I did 1 part paint to 2 parts water. Brush your whitewash on and then wipe off the excess. Then, after that dried I wanted it to be a little warmer so I added some Ralph Lauren glaze in Smoke. This is my absolute favorite glaze it antiques just right and warms up your furniture!

Let’s just pretend my floors were mopped & that sippy cup wasn’t there mmkay?? But here is the sneak peak to our new Farmhouse Table!! I am in. love. I’ll post some more pictures soon!
So that is how I got my “barn wood” look for my table. I’ve heard you can add tea to the concoction. Maybe I’ll try that next time. Have you tried this?? Do you have any tips to add?
Jul 30, 2012
Tips on Welcoming Your Baby

There is a lot to do during a woman's pregnancy before she gives birth to her baby. Regular prenatal appointments, getting the home ready for the baby, and learning about what will be needed for daily care of a newborn are all important aspects of preparation for motherhood. In addition there are many preparations that can be made concerning the actual delivery day – here are just a few.
Birthing Classes
Birthing classes can help mothers feel more prepared for labor and delivery, particularly with first-time mothers. The information given by birthing instructors can help prepare mothers for what will happen to their bodies on delivery day, and give them tools and techniques to get through delivery. The birthing classes at hospitals also give mothers information about the hospital's maternity ward and its procedures. The literature given by the hospital can further help prepare mothers for delivery day.
Create a Birth Plan
A birth plan is a written outline of what a mother does and does not want during labor and delivery. Birth plans can be as loose or detailed as a mother wants, and they include information such as what interventions a mother is comfortable with having or whether or not she wants nurses to give her baby a bottle or pacifier. Remember that many unexpected things can happen during delivery that may cause you and your doctor to have to deviate from your birth plan. Keep in mind that holding your healthy baby in your arms is the ultimate goal of everyone so stay flexible when it comes to your birth plan.
Other Considerations
Speak with your doctor ahead of time to understand what sort of treatments and options you think will be best for you and your newborn baby. Considerations such as breastfeeding or using formula, natural or planned delivery are some important options to talk about before your delivery day. Another option to consider is cord blood banking, a process where the umbilical cord blood is collected after your baby is delivered and sent to a cord blood bank to be saved as a potential medical resource for your family.
Organize at Home
To help things go more smoothly, preparing as much as possible at home ahead of time can be a big stress reliever. Making a list of what needs to be taken care of before leaving for the hospital will help make sure everything is organized in plenty of time. This list can include things like arranging for child and pet care, making food ahead of time for after the baby is born, and packing a bag to take to the hospital. Mothers can also have an informal phone tree to make sure that friends and family know when she goes into labor without needing to call everyone on her own.
Getting ready to bring baby home can be an exciting time for mothers. Part of that preparation should be getting ready for the actual labor and delivery. Welcoming a baby into the world begins with his or her first moments of life, and preparing for labor and delivery will help mothers make sure those first moments are joyous ones.
This article was written by Katie Moore. Katie is an active writer within the blogging community who discusses maternity, motherhood, prenatal health, childbirth and other topics within this niche. If you have any questions or would like to connect with Katie please contact by visiting her blog, Moore From Katie or her twitter @moorekm26.
Jul 27, 2012
Friday Faves {no. 12}
1. I want add this cutting board holder to my cabinets. Such a great idea! I have a tiny kitchen and I need all the extra storage I can get!

2. Oh I love love the bubble necklaces from J-Crew but can’t bring myself to spend $150 for one. I absolutely love these from Cheerfully Charmed . The cobalt blue is now officially on my wishlist. Hint hint for the hubby ;) JK he just built me a table (pictures to come) & brought me flowers last week. I think he’s off the hook for awhile!

3. What would a friday faves be without some sort of unhealthy food?? I love Chik-Fil-A because my kids love it and I secretly do too. We may or may not go once a week…don’t judge. Plus, their mints are amazing and so is the chik-fil-a sauce.

4. I am really wanting to chop all of my hair off. I’m so sick of it and really needing a post baby hair do. I really like this haircut with different color, because I’m not feeling that bold.

5. I love this article on Real Simple Cutting x’s in a box is a genius idea for carrying cupcakes. Why didn’t I think of that??

Jul 26, 2012
Easiest Taco Soup Recipe
I'm also going to post this at my best friends blog she started called Basic Bites. It's a blog for a whole bunch of yummy recipes!

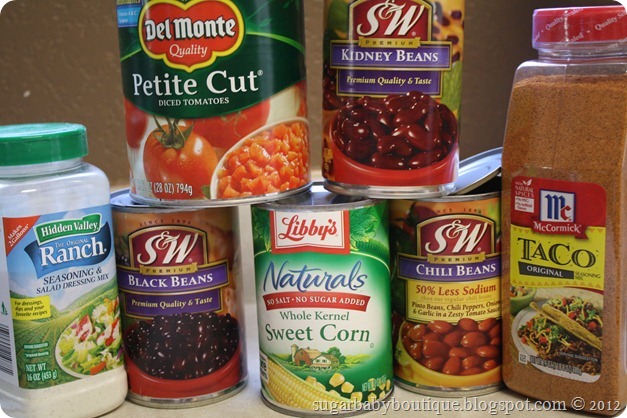
-1-2 large cans diced tomatoes
-1 can kidney beans
-1 can black bleans
-1 can zesty chili beans (s&w are the best)
-1 can corn
-1 onion (chopped)
-1 packet ranch dressing mix (I buy the big one at Costco and use about 3 Tbl)
-3 Tbls Taco Seasoning
*Throw it all in the crockpot & cook for 7-8 hours on low.
*Top with cheese, sour cream, & Avocado. Eat with an entire bag of tortilla chips ;)
Yay!
Jul 23, 2012
How to Make a Chevron Maxi Skirt

Start off with your striped fabric. I chose wide stripes because I knew matching them up to make a chevron would not be fun with small stripes. But to each his own :) I had 3 yards of fabric which was waaay too much. But I am also a shrimp so I’m not sure exactly how much you need. Just make sure it’s plenty long enough for you. Fold your fabric in half (hot dog style) and then in half again (hamburger style) Did that bring you back to your elementary days?? hah

Now you are going to make a pattern for your skirt. Measure your waist or where you want the top of your skirt to hit. Then measure how long you want it to be. (I always make my patterns on tissue paper because it’s easy to pin on fabric and you can see through it to see what you’re doing) Draw a line using your waist measurement and then using a ruler draw a line down for how long you want it to be (adding an inch for seam allowance). I also made mine a tiny bit A-lined. Now fold your pattern in half. We will only be using half of your pattern. Lay it on top of your folded striped fabric at a 45 degree angle. Before you cut make sure your lines are angled enough to make a good chevron! *Mine was a little more than the picture shows but hopefully you get the idea.. **Also cut a little bigger than your pattern to make sure you have plenty of fabric to work with while cutting and sewing.

You should now have a 4 pieces that look like this (2 pieces should have the stripes one way and 2 will be going the other way):

Take two of your pieces that are opposite and sew them right sides together (do the same to the other two pieces) Be very careful to match up the stripes. You want them to look seamless so the chevron is accurate. I pinned like crazy and sewed really slow.:


You now have your skirt body ready! Make a waistband from your fabric. I cut 2 rectangles that were: my waist measurement x 6 inches. Fold each rectangle down making it 3 inches with a folded top. Sew your waistband rectangles together, making a tube. Now, sew your waistband to your skirt body right sides together, just like we did in the pencil skirt here.
ANNND you are finished! As I said here I didn’t add elastic because I was pregnant and wanted it to be very comfortable. However I am going to add elastic now to make sure it stays up :) Depending on how stretchy your fabric is, you may or may not need to add elastic in the waistband. You will want to make it smaller than your actual waist measurement though.
I would LOVE to see if you attempt a chevron skirt of your own! Email me and I’d love to see!!

PS Haleigh Rohner photography took my maternity pics and she is fantastic!
Jul 21, 2012
Want to make yourself a chevron maxi skirt??

Haleigh Rohner Photography took my maternity pictures. I can’t even begin to describe how awkward I am when I get pictures taken of myself. I have to say I’m glad Haleigh talked me into getting some taken. Even though I was 9 months pregnant :-/ But she is so good at making you comfortable and getting good pictures even if you make dorky faces the entire time :)
Jul 20, 2012
Friday Faves {no. 11}


Jul 18, 2012
Pinned! Food. Food. Food.
A friend from high school started the best food blog! She has all the best recipes that look devine. This bread recipe was SO good! I loved it. I love having fresh homemade bread and had gotten used to making it once a week before the baby. I think I'll have to get back into that routine again...

I made this Creamy Bacon Carbonara the other night and it was DElish!
This was last nights dinner and the husband and kids approved. I love finding meatless meals that are actually filling too! (I may or may not be a little weird about cooking meat. Plus it makes the meal SO much faster and easier to cook!)

Last but not least we tried this marinara sauce a couple weeks ago and it was so good! Plus I had a ton leftover to freeze, which makes for some easy dinners this week!

Have you tried any good recipes lately I need to try?? Do you find all of your recipes from Pinterest like I do? ;)
Jul 13, 2012
Friday Faves {no. 10}
We went to Utah for the 4th of July and I feel like I should share my favorite places to go eat. Maybe because that’s all we do while we are there. Eat. We have to schedule out where we are going to eat everyday to make sure we visit all of our favorites.
1. Pizza Factory. This place is a must, and only because I’m obsessed with their breadtwists. I am a huge bread fan and their breadsticks are divine. The salad bar is pretty good too. Funny enough, I’m not a huge fan of their pizza.

2. Swig. We were introduced to this little lovely this vacation and I am sold. It’s a cute little place that sells shaved ice. But that’s not the best part. They have sugar cookies that are to die for. Paired with a vanilla coke and I was in heaven. Kyle had a peanut butter cookie and he approved as well. I give it a big 2 thumbs up!

3. Kneaders. Yuuum We went here to celebrate Mi Madre’s birthday and it was way good. I got the turkey artichoke sandwich and it was delish. I also had to sample some of their treats and the chocolate mousse dome was FABulous. We used to go here for breakfast and they have some pretty great french toast.


4. Mi Ranchito. We have to come here every trip at least once. My mom is obsessed. It is pretty yummy and I think I finally truly appreciated it this trip.

5. The creamery off of 95th…Ohhh boy I love their ice cream. Especially Earnestly Chocolate. It is chocolate ice cream with marshmallow & caramel swirl. With chocolate caramel cups mixed in. What more could you ask for??

6. Zupas. We just got one of these in AZ but we still have to visit it in Utah. I love love this place. The nuts about berries salad is one I crave. Along with the Wisconsin Cauliflower soup & the Ultimate Grilled cheese…Anyone hungry yet??

Jul 12, 2012
Fresh Salsa Recipe
Cold Salsa in the summer time is probably one of my very favorite snacks. We can go through a batch & a whole bag of chips in one sitting. Don’t judge me. Pair it with cold fresh fruit and I’m one happy girl. Here is how I make our salsa around here…
Gather all your ingredients:
-3 fresh tomatoes
-1 can of tomatoes
-1 bunch cilantro
-1-2 garlic cloves
-1 jalapeno (seeds removed if you don’t want too spicy)
-1 lime
-Red pepper/green pepper (or red pepper flakes)
-Salt & Pepper
-1/2 onion
Cut up 2 of the tomatoes, your jalapeno, & your pepper and throw it all in the blender/food processor. Add your cilantro, garlic, can of tomatoes and your salt & pepper to taste. Chop it all up until you get your desired consistancy.

Now we like our a salsa with a little chunk to it so I save one of the tomatoes and chop it up & put it in a big bowl.

Squeeze your lime into the bowl with your tomatoes…

Chop up your onion. My husband’s not a huge fan of onion so I chop ours up real fine.

Dump out the salsa from the blender into your bowl and mix it all up! Now you’re ready to pull out your tortilla chips and dig in! YUM.

If you’re making salsa for a big group try adding another can or two of tomatoes, more cilantro, garlic & maybe another jalapeno. This is a crowd pleaser :) Hope you all are enjoying your summer so far..
Jul 10, 2012
20 Minute Jersey Pencil Skirt

Start off with an old T-shirt or some jersey knit fabric. measure the waist, and how long you want the skirt to be. I measured it to hit just under the knees. The great thing about using a T-shirt is you don’t have to hem the bottom! Making this skirt the easiest there is…So, for this skirt I measured my daughter and her waist measurement was 21 and the length I wanted was 12. When you cut the shirt it is already doubled. Make sure, if you are using fabric, that it is doubled so you have two rectangles. So I cut 2 rectangles that measured 11 inches wide and 12 1/2 inches long. That leaves plenty of room for seam allowance, since we don’t have to hem. If you are using new fabric you will want to allow for more of a seam. The waistband was cut from more of the fabric and it measured 21 inches by 2 inches. If I had more fabric leftover I probably would have made the waistband 4 inches so it was a little bigger. You also want the waistband to be exactly the measurement of your waist so it’s tight enough to stay up.

Once you have you’re pieces cut, sew the main piece right sides together. Then flip it around, and you have made the main part of the skirt. I forgot to take a picture of the waistband but you just fold it in half, and then sew the ends together to make a tube. Then you sew the waistband to the main body (right sides together) Then when you flip the waistband up your skirt is done! If your jersey is stretchy enough you can get away without using elastic. However I made another one for my other daughter with a different fabric and I’m going to need to add elastic in the waistband. Now, try your skirt on your little one and pull out your camera. Ha I got some pretty sassy poses out of her…she loved this skirt so much, especially with high heels on. She told me she loves it because she looks just like her church teacher...too funny. Now go make yourself one (or two or three!!) **If you have a serger that would be the best way to sew this, but I just used my regular sewing machine and used a stretch stitch. I think I actually just zigzagged this one…


