#2 CHERYL!!! Congratulations :) I can't wait to hear what you use the brochures for. Thanks to everyone for participating! I'm getting so close to 100 followers which means....another giveaway! So recruit some friends and be on the lookout for a giveaway real soon! Thanks again and have a great Monday!!

Aug 29, 2011
Aug 25, 2011
Clever Organizing Tips & Tricks...
Here are some of the latest {free} organizing tips I have. (Since those are the only tips I usually go for...) We all know I love to decorate/make use of crappy stuff because I may be the cheapest person you know, so here are some of the things I've done to organize the little things in my house. It's the little things that count? Here it goes...and no I did not think of all of these myself so I will try to give credit where credit is due.
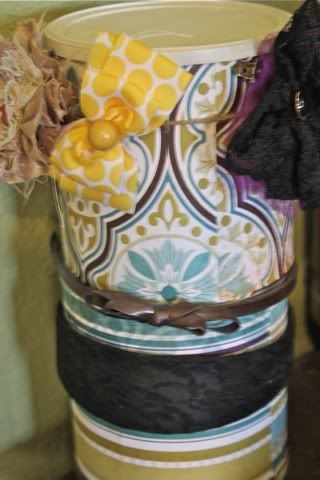
I did this project about 2 years ago before I had even thought about getting a blog. So, I'm not sure where or who I got this idea from...But this is just two old formula cans covered in paper with modge podge, to hold all your headbands. I also added some twine on the top to hold bows, because we have a bajillion bows around here. (I know bajillion isn't a real number...)
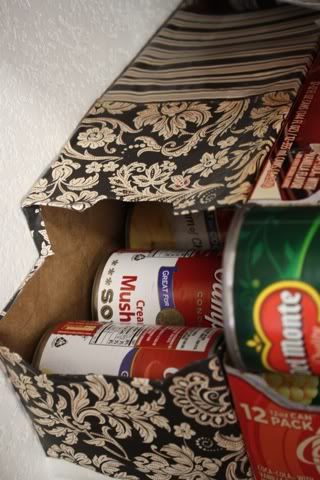
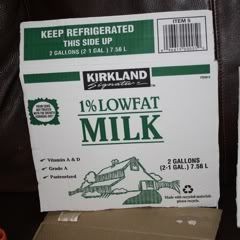
Here, I used this tutorial and turned an old soda carton into my canned food storage! (yep I was too lazy to take it out of my crammed pantry to take the picture, and I also was too lazy to cover the second soda carton. Don't judge.)
I haven't actually done this one yet but I just got all of my boxes in the mail and I'm so excited to get all of our magazines organized! You cut flat rate boxs into magazine holders, and then of course you can paint them or cover them in scrapbook paper...
Last but not least, the last craft day I did with some friends I decided I'd take the time to organize my unruly ribbon collection. At the time it was taking up: 1 tub, 2 wipe boxes, and a mason jar. Now...
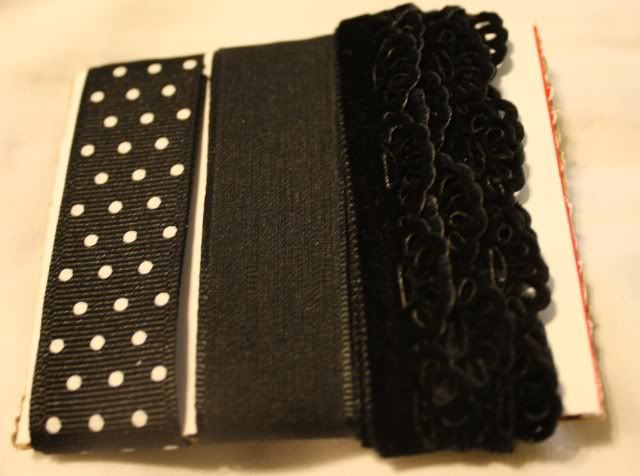
It's ok to be impressed because now I'm only taking up HALF of the tub and that's it. Now I feel like I don't have any ribbon at all. Does that mean I'm allowed to buy more?
* I know part of my problem with getting my stuff organized is that it takes a lot of time and money. But there are so many ideas out there to get organized for free/cheap and I am loving it. Anyone have any other good storage ideas?!
P.S. Don't forget about the giveaway ending on Saturday!! Please go enter, you may be my new best friend if you do :)
I did this project about 2 years ago before I had even thought about getting a blog. So, I'm not sure where or who I got this idea from...But this is just two old formula cans covered in paper with modge podge, to hold all your headbands. I also added some twine on the top to hold bows, because we have a bajillion bows around here. (I know bajillion isn't a real number...)

Here, I used this tutorial and turned an old soda carton into my canned food storage! (yep I was too lazy to take it out of my crammed pantry to take the picture, and I also was too lazy to cover the second soda carton. Don't judge.)

I haven't actually done this one yet but I just got all of my boxes in the mail and I'm so excited to get all of our magazines organized! You cut flat rate boxs into magazine holders, and then of course you can paint them or cover them in scrapbook paper...
Last but not least, the last craft day I did with some friends I decided I'd take the time to organize my unruly ribbon collection. At the time it was taking up: 1 tub, 2 wipe boxes, and a mason jar. Now...


It's ok to be impressed because now I'm only taking up HALF of the tub and that's it. Now I feel like I don't have any ribbon at all. Does that mean I'm allowed to buy more?
* I know part of my problem with getting my stuff organized is that it takes a lot of time and money. But there are so many ideas out there to get organized for free/cheap and I am loving it. Anyone have any other good storage ideas?!
P.S. Don't forget about the giveaway ending on Saturday!! Please go enter, you may be my new best friend if you do :)
Aug 24, 2011
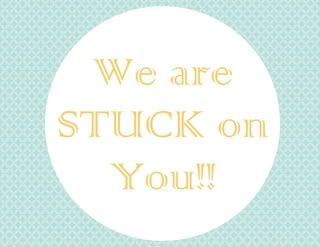
Teacher Printables!
So, I'm probably a little late on this one but my daughter doesn't start preschool for another week. I just now started to think of a cute way I could get some supplies to her teacher. Here are the printables I used for our little teacher "gifts" this year...
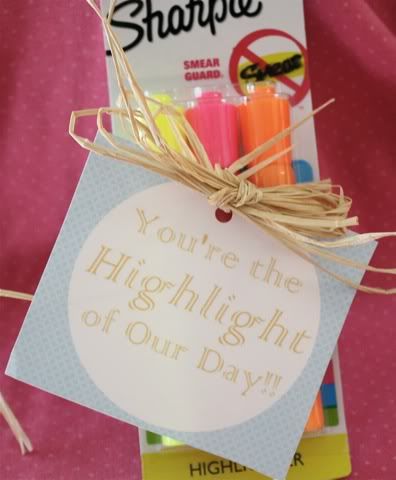
*Feel free to use these for personal use only :) Just right click and save as...then print, cut out, and tie to highlighters/glue sticks with ribbon, yarn, raffia...the possibilities are endless.

*PLUS! Don't forget to enter the giveaway HERE Thanks!!

*Feel free to use these for personal use only :) Just right click and save as...then print, cut out, and tie to highlighters/glue sticks with ribbon, yarn, raffia...the possibilities are endless.


*PLUS! Don't forget to enter the giveaway HERE Thanks!!
Aug 23, 2011
Giveaway!!
Alright people, it's time for my first giveaway!! I'm so excited about it...I was going to wait until I had something from my shop to giveaway but since I've been such a slacker I decided to go ahead with this one! I was so excited when I was asked to do this giveaway and have been thinking of all of the possibilities ever since! These brochures are high quality, and are the perfect way to get the word out about your business. I haven't decided what I will do with mine. Although, my husband thinks he has claim on them :) I also do hair, and they would be the perfect way to reach all of my clients and send out special offers. As well as using them to promote any business (small or large), Etsy shop, upcoming boutiques, etc. You, my friend, are eligible to win 50 brochures from Uprinting. Here are all the prize details:

50 pcs Brochure printing for One (1) Winner
50 pcs Brochure printing for One (1) Winner
8.5" x 11"
100lb Paper Gloss
With Folding (Half Fold, Trifold/Letterfold, Z-Fold, Roll Fold, Accordion Fold)
Outside and Inside Printing
2 Business Days Turnaround
*Free shipping
Restriction: Limited to *US residents 18 years old and above only
Now for the fun part! All you have to do is be a follower of Sugar Baby Boutique and leave me a comment. Tell me how cool I am. HA jk Just tell me what you think you would use your brochures for!
ALSO If you'd like extra comments please do any or all of the following:
-Blog about the giveaway
-Facebook about the giveaway
-Twitter about the giveaway
*That's 4 chances to win!!(Please leave a separate comment for each entry) I will use random.org to pick a winner announce it on Sat. Aug 27th so you don't have much time to enter!
**Giveaway is now closed! Thanks!!**
Disclaimer: This giveaway is sponsored by UPrinting.com, an online printing company. No monetary compensation was given and I will receive brochure printing services for hosting. Print brochures online at UPrinting.com and see their available brochure templates.
Aug 11, 2011
And 8 Months Later...

Finished! I finally finished my new "entertainment center"!!! Hallelujah! This baby has been sitting on my back porch for the last 8 months. Why? Because I had no idea where to begin. Plus I have 2 toddlers and found it way to difficult to find a saturday that my husband could take the kids so I could work on it. Well, this last weekend was the day! I picked this up at goodwill for...wait for it...$5! Yup practically free. That's what I told my husband at least. And I conveniently left out the little tidbit of info about this hole...

When he came to pick it up at Goodwill, he almost turned right back around. Our conversation went a little like this
K: "What the?? You're kidding. You're kidding right??"
C: "It's perfect!! The one and only..."
K: "There's no way to fix that. This is ridiculous, I'm leaving"
C: "Please please please please..."
K: "Fine."
I Love my husband. He may think I'm crazy half the time but he usually will go along with my insane ideas (while rolling his eyes the whole time haha) But this time I think it is project success :) Here's the before again, in all it's glory. Yes there is a huge spot of nastiness on top that took forever to clean up. And crayon all over it from my children. AND about a thousand crickets living in it. (I might have gagged the entire time I cleaned this out.) I used up one whole can of lysol and 2 full canisters of clorox wipes. I was that grossed out, but it was worth it, I think.

After the hubby patched it up...

And now all primed, painted, sanded and glazed...


*Total cost for this was under $20...I love that. And now you know you don't have to pass up the nasty of the nasty if there is potential :) It's definitely not a perfect patch job {I know} BUT I don't think you can see where the hole was too badly and for $20?? I'm ok with it...
Aug 10, 2011
So Delicious...
This recipe is definitely one of my family's faves. I had completely forgotten about them until the other day and then I couldn't get them out of my mind. So of course I had to make them, and by 9:30 AM they were half gone. oops! haha I may or may not have self control. Here is the recipe, you can thank me later...or be mad at me for the 5lbs you might gain :) Enjoy!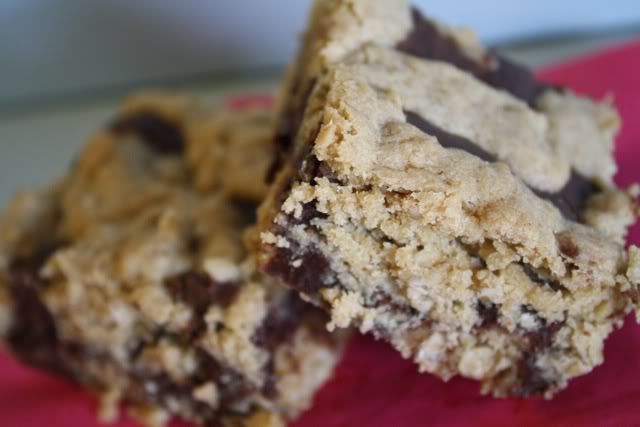

Fudgey Squares
1 pkg. Choc. Chips
1 Can Sweetened Condensed Milk
3 Tbs. Butter
2 tsp. Vanilla
(Melt in pan over very low heat.)
1 C. Butter
2 C. Brown Sugar
2 Eggs
(Cream Together)
2 ½ C. Flour
1 tsp. Baking Powder
1 tsp. Salt
¾ C. Oats
(Stir in to egg/sugar/butter mixture)
Spray 11/14 pan, pat ¾ of mixture into bottom, pour fudge over top, then add remaining ¼ of dough on top in splotches.
Bake at 350 for 20 minutes.
*Here they are all packaged up to take to some friends...You may want to do this before you taste them or you might not have any left...just sayin...
*I got the cute tags here


Aug 8, 2011
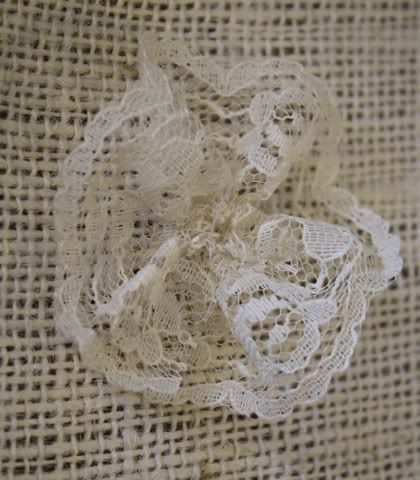
Lace Bow Tutorial
I just made a bunch of these for a bow exchange and thought I'd share the how-to on here :) It's pretty simple...
Cut a piece of pretty lace, and run a basting stitch along the bottome. Pull until it becomes a little flower-ish. Haha or pull until it becomes a circle. Make sense?
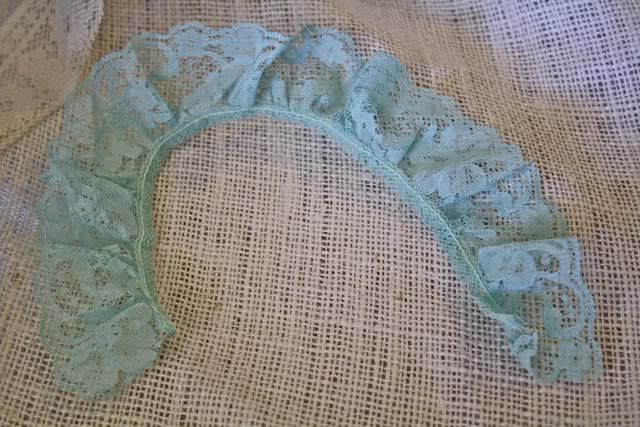
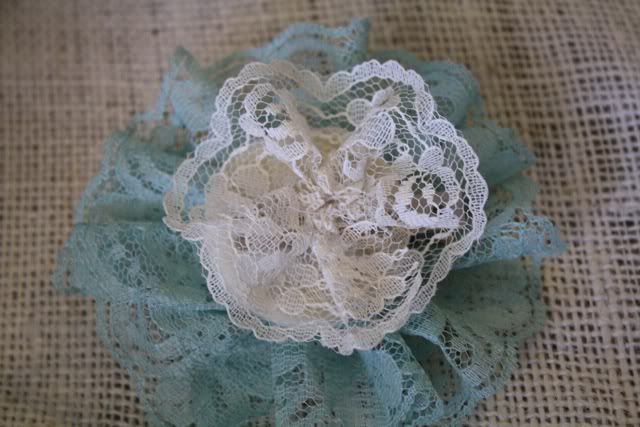
Do the same with another piece of coordinating lace
Sew or glue the two together...
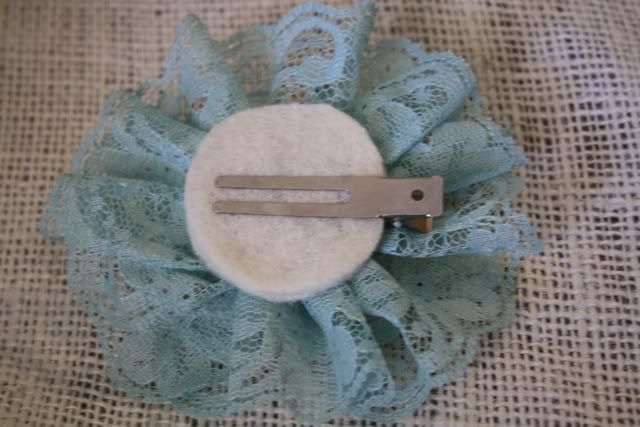
Add a felt circle on the back to cover the stitches with a hair clipe
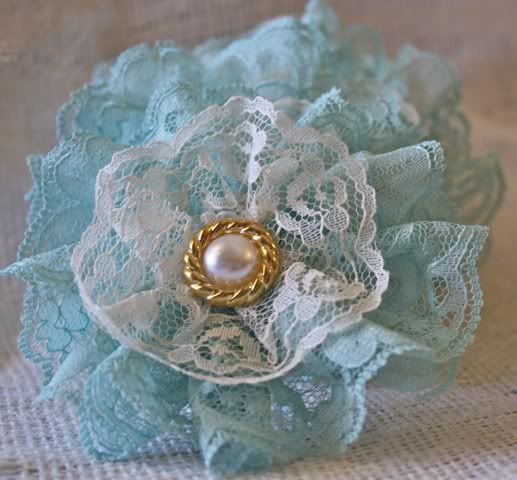
Finally, hot glue a fancy shmancy button on top and....
Hope everyone has a great Monday!
Cut a piece of pretty lace, and run a basting stitch along the bottome. Pull until it becomes a little flower-ish. Haha or pull until it becomes a circle. Make sense?

Do the same with another piece of coordinating lace

Sew or glue the two together...

Add a felt circle on the back to cover the stitches with a hair clipe

Finally, hot glue a fancy shmancy button on top and....

Hope everyone has a great Monday!
Aug 5, 2011
My Goodwill Find
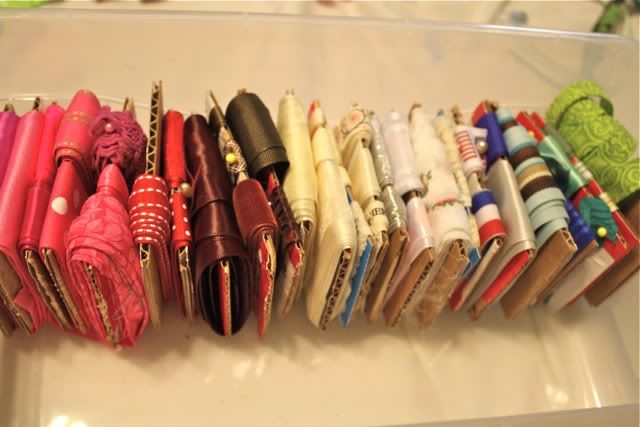
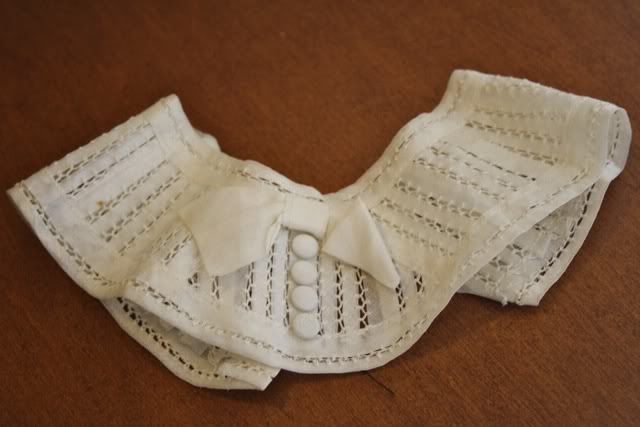
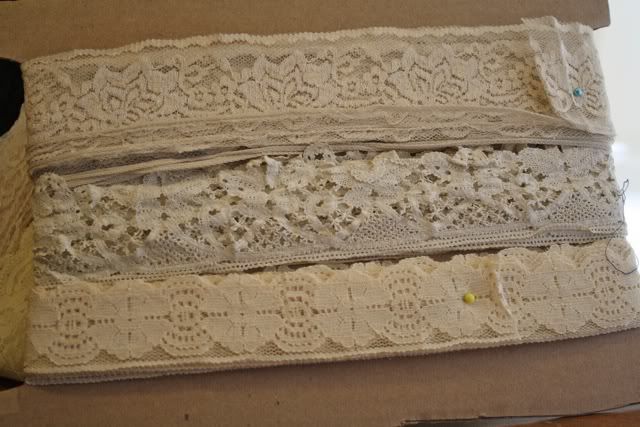
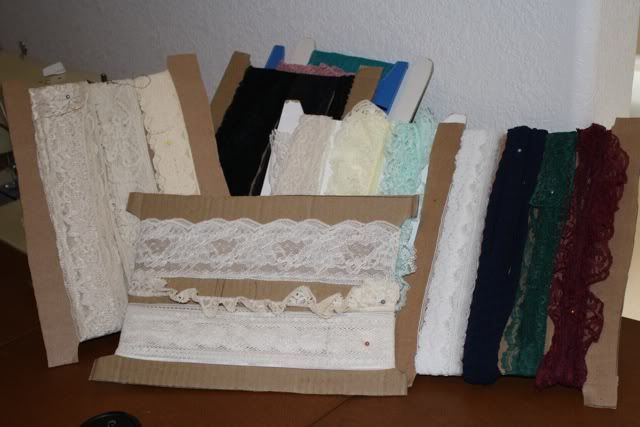
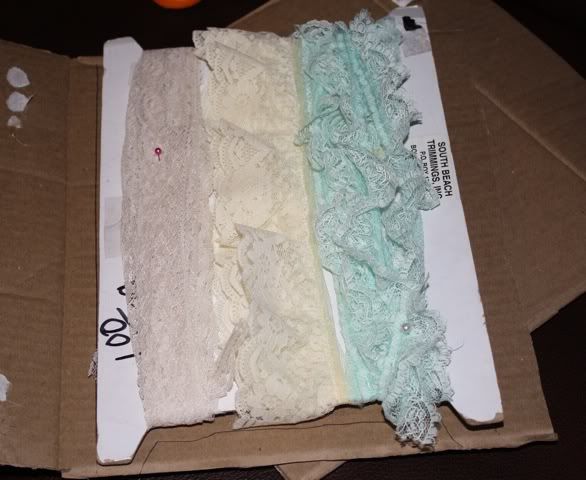
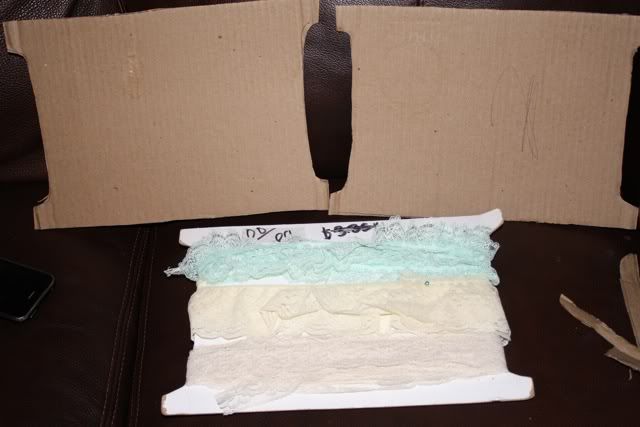
So while I've been switching everything up in our house I decided to make half of our closet into my craft area...Not ideal, but not too bad either. At the moment I was taking up 3/4 of our closet, so I went through and gave a ton up to goodwill. I had a huge black garbage bag full of clothes and shoes to donate and after I dropped it off, decided to wander in for a little. I walked in and found the perfect sewing table to fit in my closet. Woohoo! The guy said he had brought it in only 10 min before I got there. And it was half off day so it was only $20. Score! So I loaded it up and took it home. My husband and I were trying to move it in the house and it was ridiculously heavy. So, we looked in the drawers and lo and behold they were full of stuff! Me being a secret hoarder was in heaven looking through everything. From vintage lace, to old patterns and newsletters from the 40's, loads of elastic, and all sorts of dressmaker supplies. There were literally hundreds of pins and 6 pincushions. I put most of the stuff right back in a box for goodwill but there were definitely some treasures that I am ecstatic about! Here are some pictures. Oh and my lace trim supply was getting out of hand so I decided to organize them. All I did was take some cardboard boxes and cut out holders for them, wrapped my lace around and secured it with a pin. Now they're all nice and neatly organized :)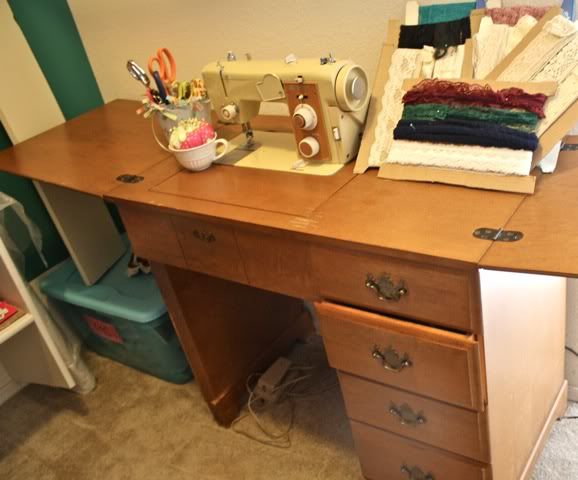

I'm thinking this needs to be a sunny yellow...thoughts?


Aug 2, 2011
Paint Stick Projects
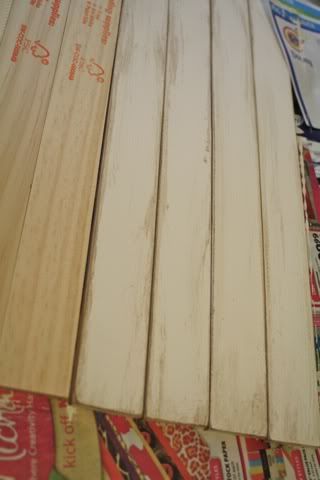
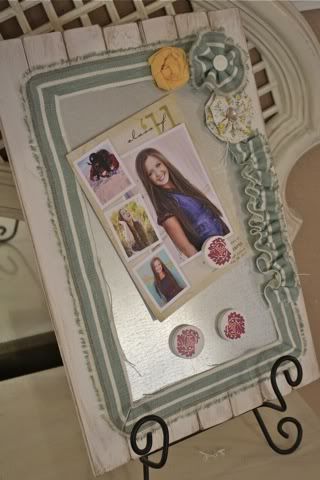
Hey everyone...It's been awhile...I've been trying to reorganize my house. It's been so chaotic and I'm trying to figure out the best way for our house to function. Half the time I decide where things will go and be organized and change my mind and have to start all over again. So, maybe someday I'll be done, and then I'll change my mind or have another baby HA! Anyways, I always have about a bajillion projects going on at once and here is one of the many I've had half done for months. I finally took the 15 minutes last night to finish it. Why is it that it takes 3 months to finish a project that will only take 15 minutes??? I have a love affair with Paint stick stirrers...They are free and they have so many possibilities! What's not to love?? Here is my favorite project I've used them for so far. AND the best part?? It only cost me 99 cents :) You know that's my kind of project... Here it goes:

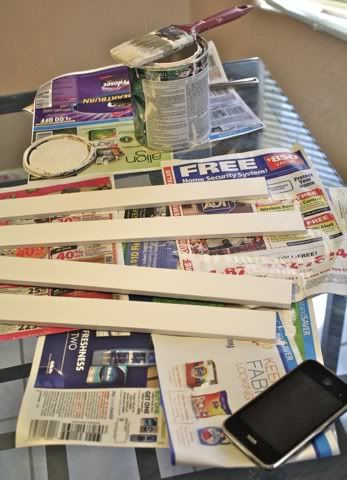

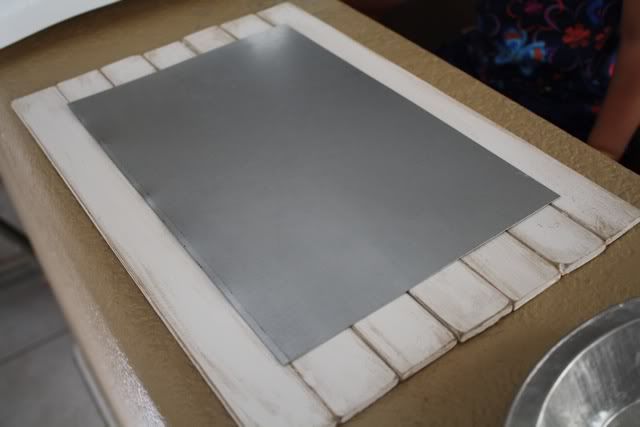
1. Go to your local Home Depot or Lowes and beg for some {5 Gallon} Paint stirrers. They may look at you like your crazy or they may be super helpful like guy at our Home Depot down the street. Most the time they're happy to give you however many you need. For this project I used 7, with an 8 1/2 x 11 metal sheet. (OR if you're embarassed to ask you can buy some at wal-mart I believe) Go home and cut them to whatever size you want and give them a fresh coat of paint. I chose Glidden's antique white (I love that they will give out samples periodically, and they last forever!) *of course you can change the dimensions all you want to make it larger or smaller. I just love that you can buy pre-cut magnet board for $1!

2. After I let my paint dry, I sanded and glazed each stick like so...
3. Next, I hot glued in between each paint stick and then put hot glue allll over the back of the magnet sheet and stuck that on. I figure between all that glue it should hold right?? If you're nervous maybe use some gorilla glue instead?
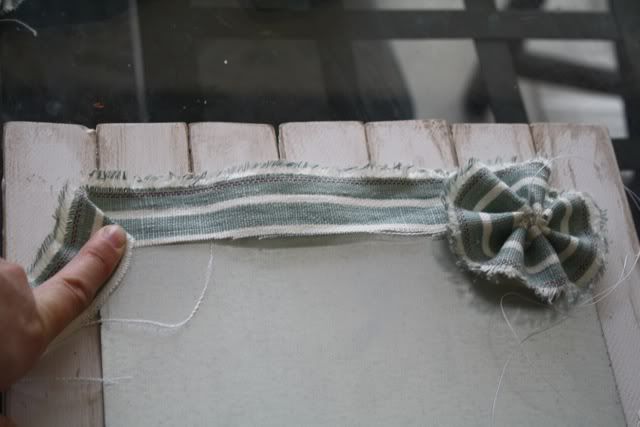
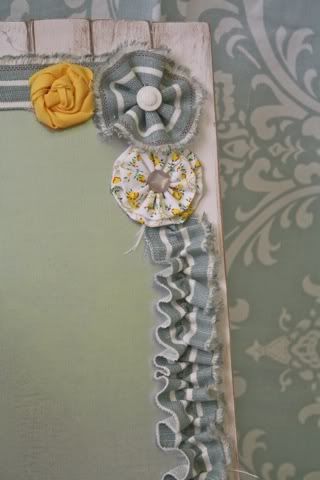
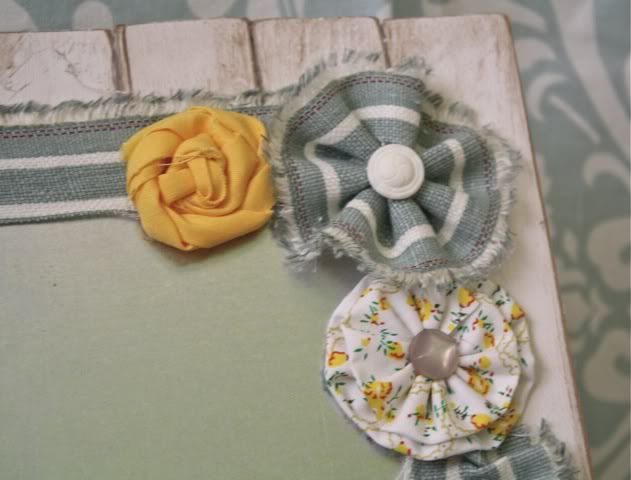
4. Then I felt like it needed some jazzing up (haha sometimes I use words that sound like an 80 yr old woman. Not that that's a bad thing...) So, I decided to add some fabric around it. This is great because it uses all those scraps I save! I LOVE when I actually find uses for them. So, I started out with one long strip of the blue and white striped fabric. I hand stitched and pulled until I got the rosette look I was going for. Then glued the flower down with the end of the fabric running along the edge. At the corner I just folded and hot glued until I got the look I wanted.
5. Keep gluing your fabric down until you run out. Which in my case was too early. OOPS! I probably should have measured, but if you know me at all you know I don't measure anything. So instead of worrying about the huge space of missing fabric, I added some more flowers for fun :)
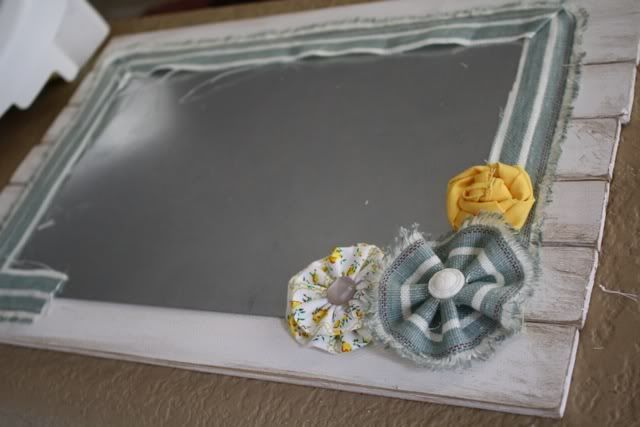
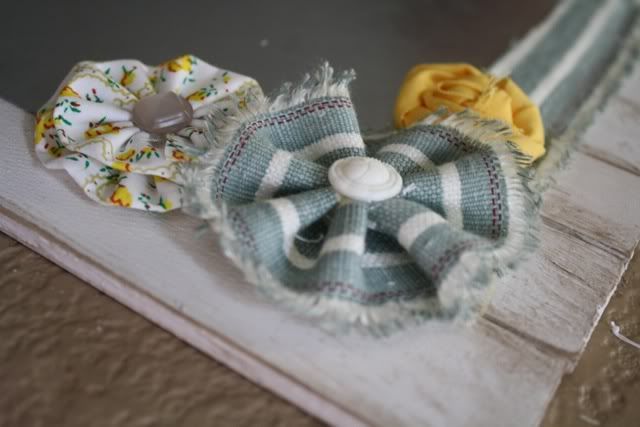
6. My husband came home and I proudly showed him my magnet board. He kindly asked why I stopped the fabric so early? haha I told him I had a plan...I did it on purpose?? Of course the answer is always a ruffle in my house so I added a ruffle and I actually like it better! Adds character right?
7. Here's the finished product! Even if I didn't have all of the stuff on hand I think this would only cost about $3. I love adding things to my home for next to nothing that serve a purpose.

3. Next, I hot glued in between each paint stick and then put hot glue allll over the back of the magnet sheet and stuck that on. I figure between all that glue it should hold right?? If you're nervous maybe use some gorilla glue instead?

4. Then I felt like it needed some jazzing up (haha sometimes I use words that sound like an 80 yr old woman. Not that that's a bad thing...) So, I decided to add some fabric around it. This is great because it uses all those scraps I save! I LOVE when I actually find uses for them. So, I started out with one long strip of the blue and white striped fabric. I hand stitched and pulled until I got the rosette look I was going for. Then glued the flower down with the end of the fabric running along the edge. At the corner I just folded and hot glued until I got the look I wanted.

5. Keep gluing your fabric down until you run out. Which in my case was too early. OOPS! I probably should have measured, but if you know me at all you know I don't measure anything. So instead of worrying about the huge space of missing fabric, I added some more flowers for fun :)


6. My husband came home and I proudly showed him my magnet board. He kindly asked why I stopped the fabric so early? haha I told him I had a plan...I did it on purpose?? Of course the answer is always a ruffle in my house so I added a ruffle and I actually like it better! Adds character right?

7. Here's the finished product! Even if I didn't have all of the stuff on hand I think this would only cost about $3. I love adding things to my home for next to nothing that serve a purpose.


Subscribe to:
Posts (Atom)